안녕하세요! 오늘은 Pushy.me 서비스를 활용하여 안드로이드 애플리케이션에 푸시 알림 기능을 추가하는 방법을 소개합니다.
Pushy는 간단한 설정으로 푸시 알림을 구현할 수 있는 서비스로, Firebase와는 또 다른 접근 방식을 제공합니다.
그럼 바로 시작해볼까요?
1. Pushy.me 계정 생성 및 애플리케이션 등록
1. Pushy.me 접속 및 계정 생성
Pushy.me에 접속하여 무료 계정을 생성하세요.
2. 애플리케이션 등록
• 로그인 후 대시보드에서 “Create New App” 버튼을 클릭합니다.
• 애플리케이션 이름과 Android 패키지명을 입력한 후 등록합니다.

프리사용은 100개까지 가능하다. 이제 로그인을 하고 푸쉬가 가능하도록 세팅을 해보도록 하겠다.

옆에 그림탭에 사각형3D 상자를 클릭하면 Application 을 등록할 수 있는 대쉬보드를 볼 수 있다.
이제 Create New App 을 선택하게 되면 아래와 같은 화면이 나타나게 된다.

2. 안드로이드 프로젝트 환경 설정
1) 새로운 프로젝트 생성
Android Studio에서 새로운 프로젝트를 생성하거나 기존 프로젝트에 추가로 설정할 수 있습니다.
2) AndroidManifest.xml 수정
Pushy가 제대로 동작하기 위해 필요한 권한과 서비스를 선언합니다.
APP NAME 은 우리가 관리할 수 있도록 아무거나 입력하면된다.
그리고 현재 안드로이드로 만들기 위해서는 Platforms 안드로이드 텍스트 입력창에 패키지 명을 입력하면된다.
입력창에는 안드로이드를 개발할때 패키지명을 입력해야된다 예를 들어 다음과 같다.
(com.testpackage.pushtest) 이런 예로 작성해야된다.
자이제 Pushy에서 세팅해줘야되는 부분은 다 되었다. 이제 코딩을 진행해보겠다.
* 기본적으로 Pushy.me 사이트에 도큐먼트가 존재해서 그대로 해주면 작동이 됩니다.
Android Studio를 실행하고 기본적으로인 코드를 생성한다.
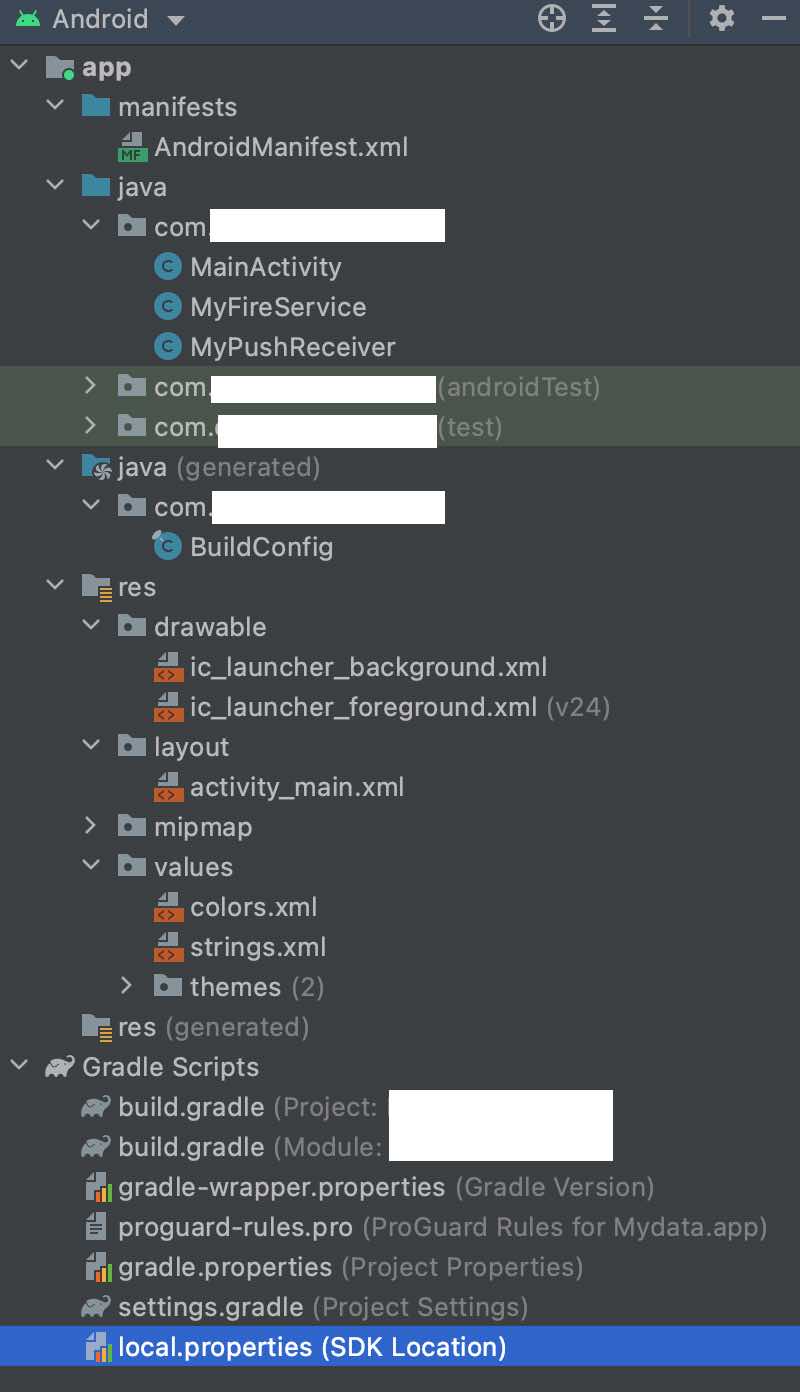
여기서 수정해야될 부분은 AndroidManifest.xml, MainActivity.java , MyFireService.java , MyPushReceiver.java ,
build.gradle (Project: XXX) , build.gradle (Module: XXX) , proguard-rules.pro
AndroidManifest.xml 을 작성해보자
<?xml version="1.0" encoding="utf-8"?>
<manifest xmlns:android="http://schemas.android.com/apk/res/android"
    package="com.XXXXXX.XXXX">

    <uses-permission android:name="android.permission.INTERNET" />
    <uses-permission android:name="android.permission.WAKE_LOCK" />
    <uses-permission android:name="android.permission.ACCESS_NETWORK_STATE" />
    <uses-permission android:name="android.permission.RECEIVE_BOOT_COMPLETED" />

    <application
        android:allowBackup="true"
        android:icon="@mipmap/ic_launcher"
        android:label="@string/app_name"
        android:roundIcon="@mipmap/ic_launcher_round"
        android:supportsRtl="true"
        android:theme="@style/Theme.Mydata">

        <!-- Pushy Notification Receiver -->
        <receiver android:name=".MyPushReceiver" android:exported="false">
            <intent-filter>
                <action android:name="pushy.me"/>
            </intent-filter>
        </receiver>

        <!-- Pushy Update Receiver -->
        <receiver android:name="me.pushy.sdk.receivers.PushyUpdateReceiver" android:exported="false">
            <intent-filter>
                <action android:name="android.intent.action.MY_PACKAGE_REPLACED" />
            </intent-filter>
        </receiver>

        <!-- Pushy Boot Receiver -->
        <receiver android:name="me.pushy.sdk.receivers.PushyBootReceiver" android:exported="false">
            <intent-filter>
                <action android:name="android.intent.action.BOOT_COMPLETED"/>
            </intent-filter>
        </receiver>

        <!-- Pushy Socket Service -->
        <service android:name="me.pushy.sdk.services.PushySocketService" android:stopWithTask="false" />

        <service android:name="me.pushy.sdk.services.PushyJobService"
            android:permission="android.permission.BIND_JOB_SERVICE"
            android:stopWithTask="false" />

        <service
            android:name=".MyFireService"
            android:enabled="true"
            android:exported="true" />

        <activity
            android:name=".MainActivity"
            android:excludeFromRecents="true"
            android:exported="true"
            android:label="@string/app_name">
            <intent-filter>
                <action android:name="android.intent.action.MAIN" />
                <category android:name="android.intent.category.LAUNCHER" />
            </intent-filter>
            <intent-filter>
                <action android:name=".MainActivity"/>
                <category android:name="android.intent.category.DEFAULT"/>
            </intent-filter>
        </activity>
    </application>

</manifest>
여기서 중요한 부분은 Pushy 관련 부분이 전부 추가 되어 있어야된다.
(필요한 부분만 작성해보았다 다른 부분은 참고하시는 분들이 알아서 해보시길 바란다)
3. 푸시 알림 구현
1) 푸시 메시지 리시버 생성
푸시 알림을 수신하고 처리할 MyPushReceiver 클래스를 생성합니다.
MainActivity.java 를 추가하고 작성해보자
import androidx.appcompat.app.AppCompatActivity;

import me.pushy.sdk.Pushy;


// MainActivity fackApp을 실행시키는 액티비티
public class MainActivity extends AppCompatActivity {

    @Override
    protected void onCreate(Bundle savedInstanceState) {
        super.onCreate(savedInstanceState);
        setContentView(R.layout.activity_main);

        // Pushy 푸쉬
        Pushy.listen(this);
    }

    // PUSHY 푸쉬알림서비스
    private class RegisterForPushNotificationAsync extends AsyncTask<Void, Void, Object> {

        public RegisterForPushNotificationAsync() {
            // Log
        }

        @Override
        protected Object doInBackground(Void... params) {
            try {
                String deviceToken = Pushy.register(getApplicationContext());
                return deviceToken;
            } catch (Exception exc) {
                return exc;
            }
        }
        @Override
        protected void onPostExecute(Object result) {
            String message;

            // Registration failed?
            if (result instanceof Exception) {
                // Log to consoleyh
                Log.e(MD_LOG, result.toString());
                // Display error in alert
                message = ((Exception) result).getMessage();
            } else {
                message = "Pushy device token: " + result.toString() + "\n\n(copy from logcat)";
            }
        }
    }
}
자이제 Receiver 를 만들어 줘야된다.
MyPushReceiver.java 를 작성해보자
import me.pushy.sdk.Pushy;

import android.app.NotificationManager;
import android.content.BroadcastReceiver;
import android.content.Intent;
import android.graphics.Color;
import android.content.Context;
import android.app.PendingIntent;
import android.media.RingtoneManager;

import androidx.core.app.NotificationCompat;

public class MyPushReceiver extends BroadcastReceiver {
    @Override
    public void onReceive(Context context, Intent intent) {
        // Attempt to extract the "title" property from the data payload, or fallback to app shortcut label
        String notificationTitle = intent.getStringExtra("title") != null ? intent.getStringExtra("title") : context.getPackageManager().getApplicationLabel(context.getApplicationInfo()).toString();

        // Attempt to extract the "message" property from the data payload: {"message":"Hello World!"}
        String notificationText = intent.getStringExtra("message") != null ? intent.getStringExtra("message") : "Test notification";

        // Prepare a notification with vibration, sound and lights
        NotificationCompat.Builder builder = new NotificationCompat.Builder(context)
                .setAutoCancel(true)
                .setSmallIcon(android.R.drawable.ic_dialog_info)
                .setContentTitle(notificationTitle)
                .setContentText(notificationText)
                .setLights(Color.RED, 1000, 1000)
                .setVibrate(new long[]{0, 400, 250, 400})
                .setSound(RingtoneManager.getDefaultUri(RingtoneManager.TYPE_NOTIFICATION))
                .setContentIntent(PendingIntent.getActivity(context, 0, new Intent(context, MainActivity.class), PendingIntent.FLAG_UPDATE_CURRENT | PendingIntent.FLAG_IMMUTABLE));

        // Automatically configure a Notification Channel for devices running Android O+
        Pushy.setNotificationChannel(builder, context);

        // Get an instance of the NotificationManager service
        NotificationManager notificationManager = (NotificationManager) context.getSystemService(context.NOTIFICATION_SERVICE);

        // Build the notification and display it
        notificationManager.notify(1, builder.build());
    }
}
4. Pushy SDK 통합
1) Gradle 설정
Pushy SDK를 사용하려면 build.gradle에 Pushy 저장소와 의존성을 추가해야 합니다.
코드만 입력했다고 notification이 오지는 않는다.
위 두 코드는 pushy.me 사이트 도큐먼트를 참고하여 만들었다. 이제 Gradle을 수정해줘야된다.
build.gradle(Module: XXXX.app)
dependencies {

    implementation 'androidx.appcompat:appcompat:1.4.1'
    implementation 'com.google.android.material:material:1.5.0'
    implementation 'androidx.constraintlayout:constraintlayout:2.1.3'
    testImplementation 'junit:junit:4.+'
    androidTestImplementation 'androidx.test.ext:junit:1.1.3'
    androidTestImplementation 'androidx.test.espresso:espresso-core:3.4.0'

    implementation 'me.pushy:sdk:1.0.77'
}
위에서 implementation 'me.pushy:sdk:1.0.77' 을 입력을 해주면된다.
2) ProGuard 설정
ProGuard를 사용하는 경우, 다음 규칙을 추가하세요.
proguard-rules.pro(ProGuard Rules for for XXXX.app) 에 더 입력을 해줘야된다.
-dontwarn me.pushy.**
-keep class me.pushy.** { *; }
-keep class androidx.core.app.** { *; }
-keep class android.support.v4.app.** { *; }
코딩은 거의 끝났다.
https://pushy.me/docs/android/get-sdk 여기에 접속을 해서 sdk-1.0.79.jar을 다운로드 받는다.
그리고 프로젝트가 있는 libs/ 폴더에 jar 파일을 넣어준다.

이제 빌드를 하고 액티비티를 실행하게 되면 아래부분이 실행되면서 deviceToken 을 발행하게 된다.
protected Object doInBackground(Void... params) {
    try {
        String deviceToken = Pushy.register(getApplicationContext());
        Log.d(MD_LOG, "Pushy device token: " + deviceToken);
        return deviceToken;
    } catch (Exception exc) {
        return exc;
    }
}
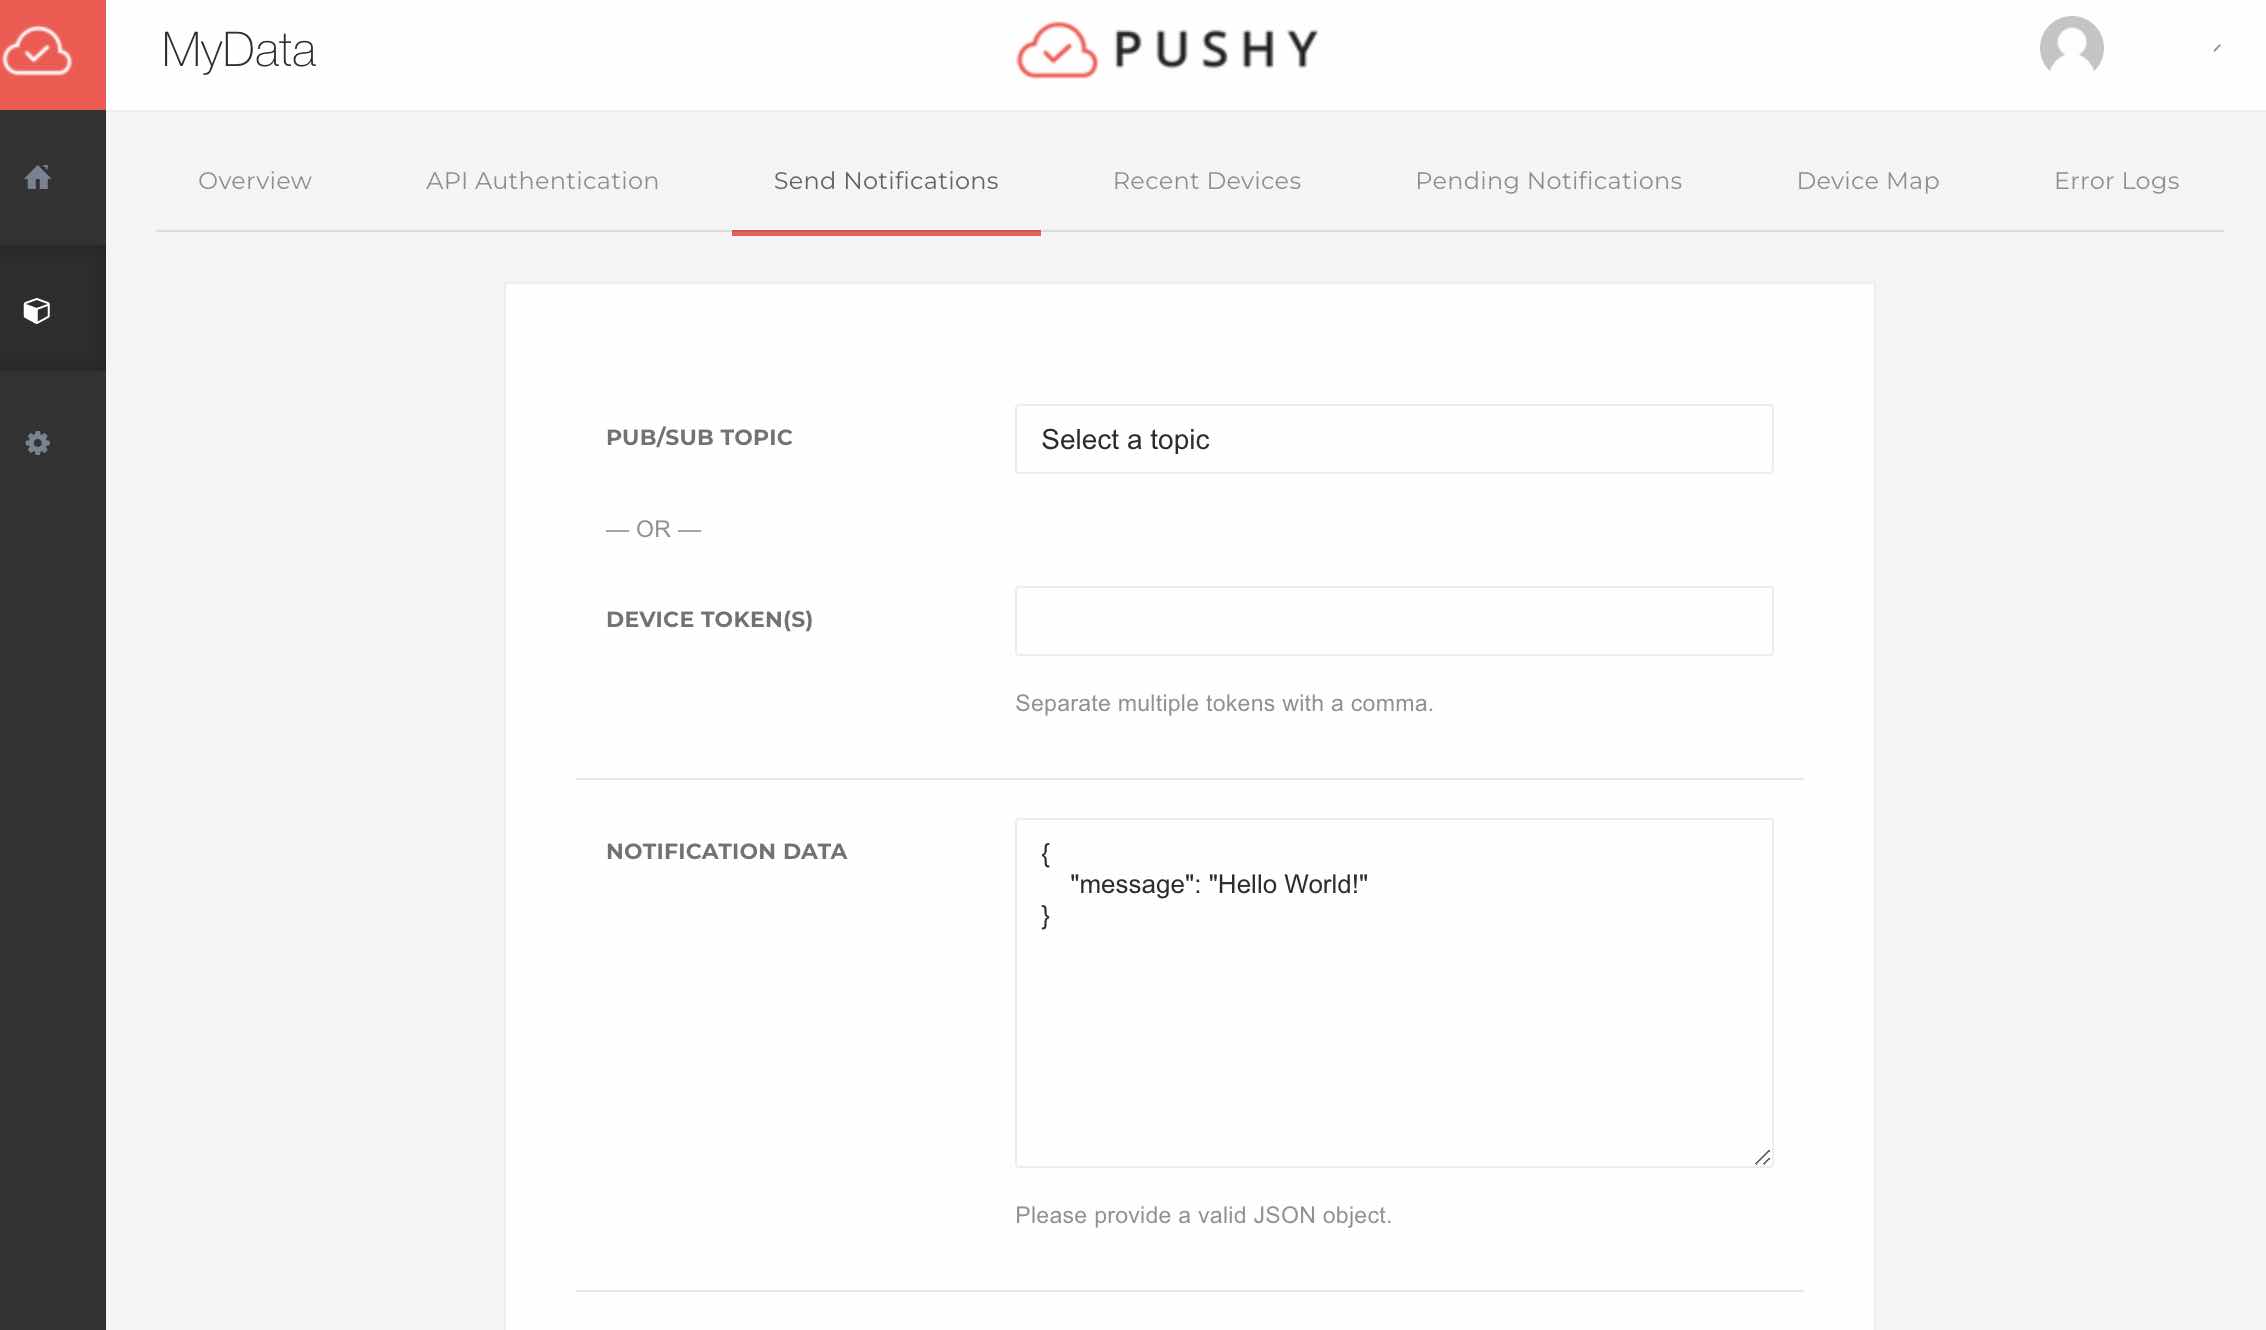
빌드를 하고 실행이 되었다면 pushy.me 에 등록이 되었을 것이다.

Recent Devices 에서 확인하게 되면 토큰이 등록된 것을 확인할 수 있다. 그리고 Send Notifications 를 클릭하여 노티를 보낼 수 있다.
5. 테스트 및 결과 확인
1. 애플리케이션 빌드
프로젝트를 빌드하고 디바이스에 설치합니다.
2. Pushy 대시보드에서 푸시 테스트
Pushy 대시보드에서 푸시 메시지를 전송하고, 디바이스에서 알림 수신 여부를 확인합니다.
이 글이 도움이 되셨다면 공감(♥)과 댓글 부탁드립니다! 더 많은 안드로이드 개발 팁을 원하신다면 구독도 잊지 마세요! 🙌

'프로그래밍 > 코딩 TIP' 카테고리의 다른 글
| 네이버 메일 EML 파일 다운로드 후 HTML 변환 및 PDF 생성하는 방법 (1) | 2024.12.13 |
|---|---|
| Python으로 실시간 환율 정보 가져오기: 네이버 금융 활용법 (0) | 2022.03.04 |

